Affichage des articles dont le libellé est sucré. Afficher tous les articles

mercredi 21 mai 2014

THE Lemon Cheesecake


We went to Paris for the weekend, see friends and families and greeting a new baby girl to the world. A very nice break, full of great food and as you can see on the picture, some cooking.

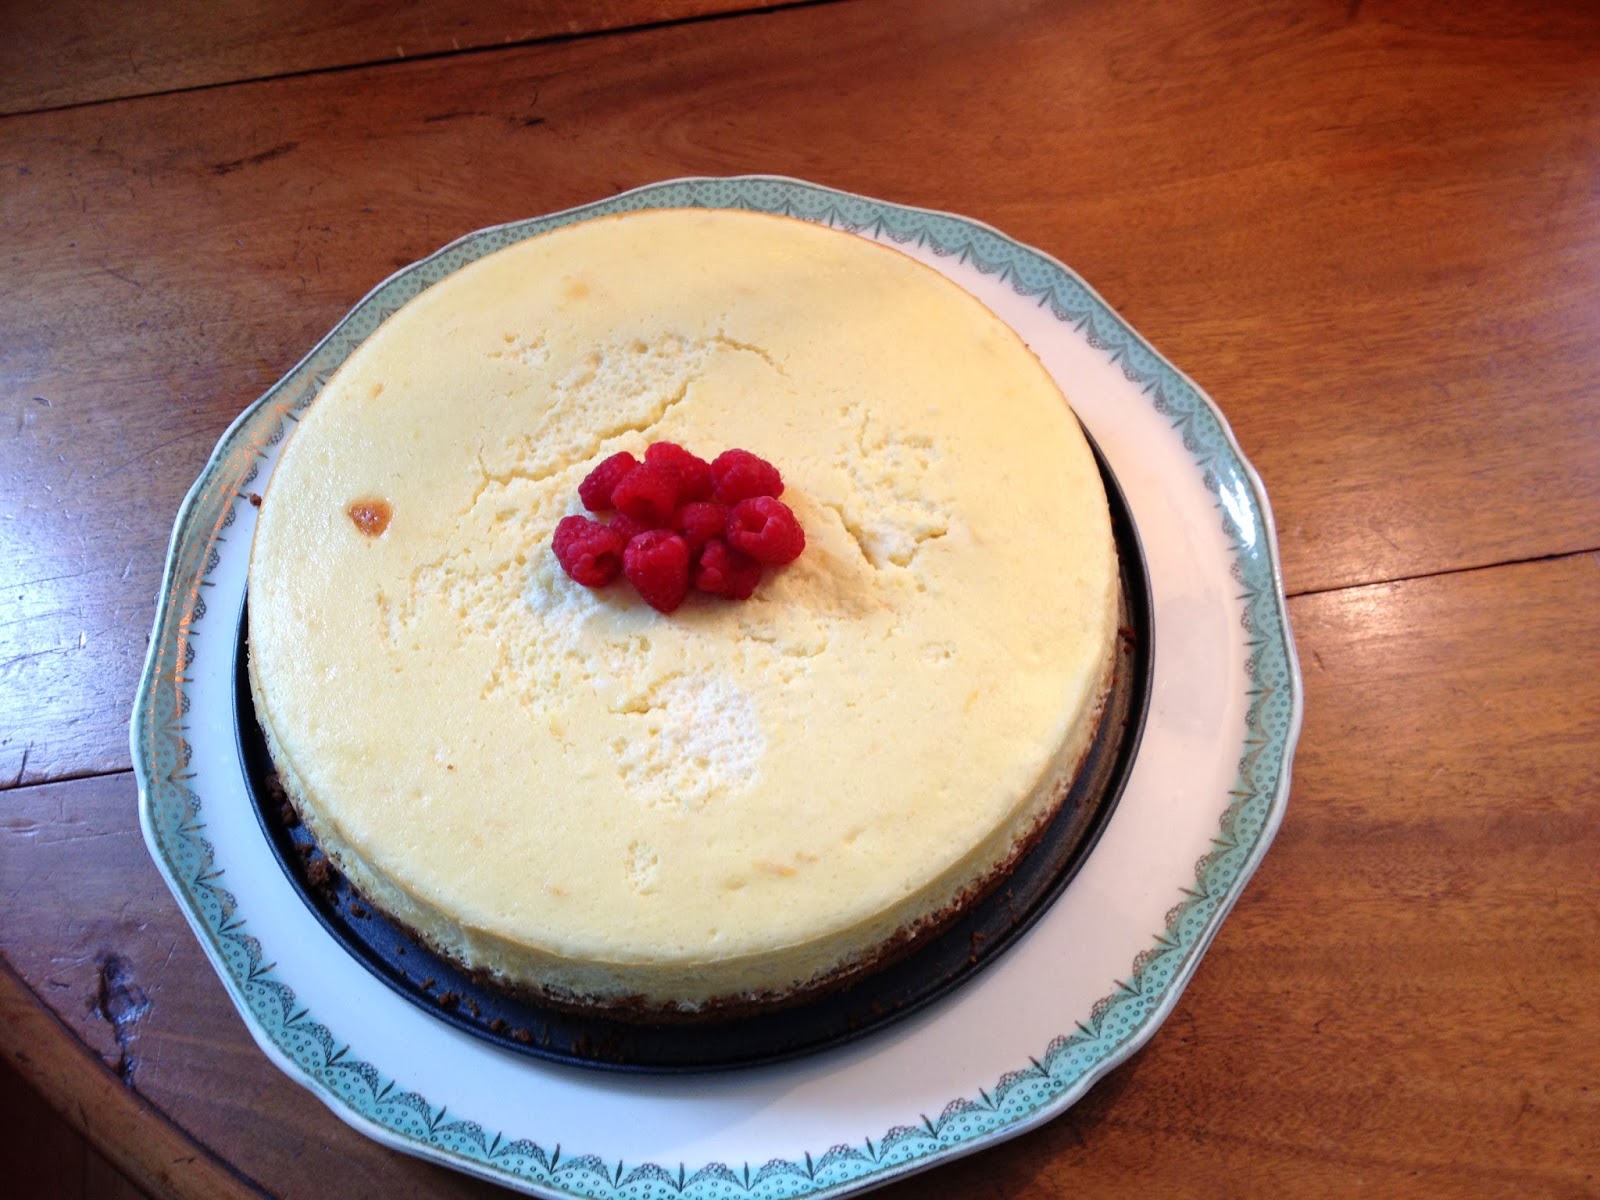
Inspiring myself from my Aunt and Godmother M-L, and working on this recipe for years, I give you the lightest and more umami lemon cheesecake ever. No sourness, no thick, compact and heavy mouthful.

The tangy and zesty taste of lemon, combined with the softness of cream cheese and the sweetness of the crust. This is to die for.

I usually write long articles before the recipe appears but it would just be cruel in this case!

So here it is.


Ingredients:
600g of cream cheese. I use St Moret as it is slightly salty
300g of speculos/bastogne
90g of butter (that can be replaced easily with coconut oil but I haven’t tested)
170g of unrefined ugar
2 organic lemons
4 eggs (yolk separated from the white)
2 large pinches of salt


1.       Heat up the oven at 160°C on traditional oven function.
2.       Crush the speculos/bastogne.
3.       Melt the butter/coconut oil.
4.       Mix the butter with the speculos/bastogne and 20g of sugar.
5.       Butter/oil a high sided pie dish and spread the speculos mixture at the bottom. Use a glass to press the crumbs. Press well or they will mix with the dough.
6.       Keep in the fridge while you prepare the rest.
7.       Grate the zest of the two lemons.
8.       From then onwards I use a mixer but you can also do it by hand. Put the egg yolks, 100g of sugar, the cream cheese and the salt in the mixer and mix until all the ingredients are blended together. Add the lemon zest and mix a little more.
9.       Whip the whites until stiff and foamy. During the whipping process add the remaining 50g of sugar little by little. This will help keep the whites stiff.
10.   Move the creamy preparation from the mixer to a large bowl and slowly incorporate the egg whites one large spoonful at a time. I use a wooden spoon and bring the creamy mixture on top of the egg white until they are fully blended in. Don’t wait or the whites will fall down and melt back to a liquid!
11.   Once you have your light and creamy preparation, pour over the speculos bottom, in the pie dish.
12.   Cook for 40-45 minutes.
13.   Once out of the oven let the cheesecake cool down before removing the dish.


Devour cold, garnished with fruits. Strawberries, raspberries, red currants depending on the season. You’ll notice I used raspberries which are not exactly in season yet but I just couldn’t resist… 


This cheesecakes gets even better after a day or two in a sealed container in the fridge.

Let us know what you think once you’ve tried it!

R.

samedi 29 mars 2014

On se lève tous pour la Choconette!


We are sorry we have been away for so long. To help you forgive us, I have prepared a little surprise.

I take it everyone has tasted (and probably adored with unrestrained devotion), Nutella.

Me too. My father (wise man) forbid us to have some in the house, so I simply bought some and hid it in my room. I would sneak out at night, cut slices of bread or baguette and spread Nutella lovingly over it. As soon as I was a student in Montréal, I bought Nutella and would eat it at every breakfast. More Nutella than bread, a glass of orange juice to balance the sweetness with acidity and it was simply delicious.

BUT. I grew up. And I read Antigone’s article on Nutella. Revelation !! Home-made Nutella CAN taste delicious and replace the industrial oily, too sweet paste I used to buy. The best thing is you can eat it without guilt, it’s 100% plant-based. 

As Antigone explains well in her article, in addition to not being healthy (which let’s face it, we already knew, it was just too good for us to really want to face the fact), Nutella is actually dangerous for your neurons, carcinogenic and contains plastic derivatives.

Sooo, instead of buying Nutella, I encourage you to try the home-made alternative: the Choconette ! (see http://antigonexxi.com/recettes/a-la-table-du-petit-dejeuner/nutella-is-dead/ for the original version of Antigone’s article).


Let’s dive straight in! (which I literally end up doing everytime I make this recipe. You should see me with chocolate up to my elbows/nose, enjoying the child-like pleasure of licking the remains on the spoon/mixer…). 

Makes a 330 ml. or 11 oz. jar (the equivalent of a Bonne Maman jam jar)

Ingredients :
  • 15 dates (around 90 g. or 3 oz.)*
  • 125 g. [1/2 cup] hazelnut butter
  • 60 ml. [4 Tbsp] agave or maple syrup (or raw liquid honey)
  • 30 g. [1/3 cup] cocoa powder
  • 15 ml. [1 Tbsp] water
* For those who don’t want to use dates, you can substitute 1/2 dried apricots and 1/2 dried bananas (but not banana chips!)

Preparation :
1. Rehydrate the dates in hot water for about 10 minutes (or 2 hours in cold water)
2. Put all your ingredients in a blender and… blend!

If your blender is not very robust, add the cocoa last as it dries up the paste and makes it harder to mix. 

Use a sterilised jar (10 minutes in boiling water), and keep the Choconette in the fridge. Ours lasts for 2 to 3 weeks, but we usually finish it well before that ! 

You see that jar? That was my first go at it. It lasted 6 days. I now systematically double this portion ;)

R

vendredi 7 février 2014

Swiss Meringue


  Sometimes a good recipe can end quite different from what you would expect. With one of our friends (C), we decided to prepare some chocolate éclair. However, we never managed to make the pate a chou properly. They were not good and stayed as flat as when we put them in the oven.
Instead of losing all the eggs white I decided to try the meringue. The ingredients are sugar and eggs white, easy enough. We don’t (yet!) have an electric whisk so all by hand. I found a variant of the universal meringue. The Swiss one. You have to beat the eggs in a bain-marie.

Ingredients:
  • ·         4 egg whites
  • ·         250 g of white sugar

Pre-heat the oven to 130°C or 250°F (th 4).
Create your bain-marie by heating a pan full of water (50°C) and put a mixing bowl over it. Start by whipping the egg-whites to a light mousse. Then incorporate the sugar little by little (1 or 2 table spoon each time) wait 5 seconds and reincorporate sugar. Remove from the warm water and beat for 5 more minutes. 

Don’t over beat it.
Stop when the mousse is strong and shiny.
Dress a baking sheet for the oven.

Create small piles of meringues by using a pastry bag or two large spoons.
Put in the oven for 1h. It as to be crispy on the outside with a little yellow colour and soft and sticky inside.

You can eat after 30 minutes or keep in a box for maximum two weeks.

M&R

dimanche 5 janvier 2014

The Orange Cake


It’s this time of the year again when the night falls fast, the temperature goes down and Christmas is over. We don’t know about you but we love winter. It’s all about being cosy at home, cooking comfort food and getting plenty of vitamins and minerals from seasonal fruits and veg. 

To keep it entertaining we’ve just used our oranges from this week’s box to make an orange cake. The first time we did it we made a mistake and put salted butter… and it was just delicious. We have now come up with a more balanced version:

·         4 large oranges
·         170 g of butter at room temperature (half salted and half unsalted)
·         130g of sugar
·         3 eggs
·         150g of flour
·         2 tbsp of baking powder (1 sachet)
·         125g of icing sugar

Pre-heat your oven to 160°C (Mark 5).

Grate the zest of two of the oranges; keep for later.

Mix the butter and the sugar until you obtain a homogenous dough. Add in the eggs and mix well.
Mix the yeast and the flour separately and add to the butter mixture slowly while mixing with a whip vigorously.

Include the zest and the juice of 1.5 oranges. You can modify the amount of juice depending on the consistency as the dough should not be too liquid, but you will need the juice of at least one orange.
Butter a cake pan and pour the dough. Put in the oven for 35 to 40 minutes. Check with a knife that it’s dry inside.

Once the cake is cooked and cooling in your kitchen, resit a bit longer!
In a pot, pour the juice from the remaining oranges and the icing sugar. Mix well until the sugar has dissolved in the juice. Bring to a boil and keep boiling for at least 7 minutes, until the mixture becomes a bit syrupy. You can test that by putting a bit of the icing on a spoon and cooling it. If it’s sticky, it’s ready.

With a ladle, pour gently over the entire surface of the cake, ensuring that the cake absorbs the syrup. Decorate with a few orange slices. 

Tuck in and enjoy!